Inochi2D - Free Open Source 2D VTuber Avatar Rigging and Puppeteering Software (Part 2 - Inochi2D Session)

My Cartoon Animator TET Avatar in Inochi2D Session.
In part one of my deep dive into the free VTuber software, Inochi2D, I focused mainly on Inochi2D Creator, which is used for rigging your character avatar in the correct file format for use with Inochi2D Session, the puppeteering part of the software.

The two sides of the software are still very much in development and the documentation, particularly for Session, is very thin on the ground. To the point where I don't think I could even do a comprehensive tutorial because I'm not sure I'm even doing things right, and the software could change significantly in a single update.

As a result, in this part of my Inochi2D deep dive I'm changing tact from presenting my finished Cartoon Animator TET Avatar, and will be summarizing my experience of getting Session up and running using OpenSeeFace as the recommended webcam motion capture software.

To do this I will be using  the TET avatar I created in my review of Mannequin, since that can be exported as a full, ready to go rig, for use with Session, bypassing Inochi2D Creator altogether. If you want to give this a try the free version of Mannequin is all you need.


Before You Start Review Your Mannequin Avatar

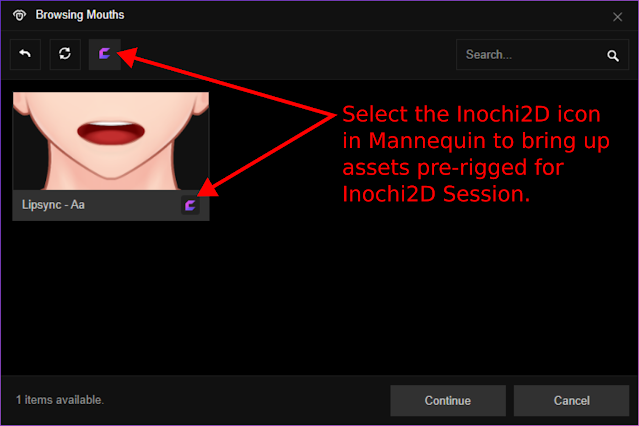
In the course of writing this article I came to realize, if you want your Mannequin Avatar to be fully motion capture rigged for Inochi2D Session, you need to make sure you use assets that are pre-rigged for Inochi2D. This means, when putting your avatar together, you should specifically filter the various asset galleries using the Inochi2D logo. For example there is only one mouth in Mannequin you can use if you want your character to lip sync in Session.

Selecting an Inochi2D Session compatible mouth in Mannequin.
There is only one mouth asset in Mannequin that is pre-rigged for lip sync in Inochi2D Session.
If any of your Avatar's facial features are not being tracked in Session chances are it's
because you've selected an asset not pre-rigged. Simply go back into Mannequin, 
change it, then re-import your avatar into Session.

Setting Up My Mannequin TET Avatar in Session

To get my character working in Session I followed the video tutorial (below) for Mannequin on how to set up your character in Inochi2D Session using a webcam

Note that this tutorial is a continuation of a previous Mannequin video tutorial that you should watch the end of for instructions on how to connect Session to OBS for livestreaming.

Exporting my TET avatar from Mannequin as an INX file for OpenSeeFace.
On the Export tab of Mannequin these are the
settings you need to pay attention to.
Export Your Character

The first step is to export your finished character from Mannequin. Set the file type to .INX for Inochi2D. You will then have a choice of which motion capture method you want to choose.

We'll be using OpenSeeFace which is for webcam. OpenSeeFace only tracks your face and head movement. Though in the female Mannequin Avatar it does appear to track something called 'body roll' which gives some upper body movement.

Since the male body avatar is still a work in progress I presume body roll will be added eventually.


Download and Run OpenSeeFace

Once you've downloaded OpenSeeFace, extract the zip file into a folder. You don't actually install it. Just run it from the folder. Windows may try to stop you but I can assure you it's perfectly safe to let it run.

The tutorial will tell you to go into OpenSeeFace's Binary folder and run the file 'facetracker.exe'. Presumably this is supposed to immediately start tracking your movements through your webcam however it did not work for me. I could tell the software wasn't tracking anything when I ran the file.

This is because my Webcam isn't the default camera on my system. I have several virtual cameras installed that take data from various applications that use my webcam. Typically you might run into this if you have any application installed that applies a filter to your webcam before sending out an image.

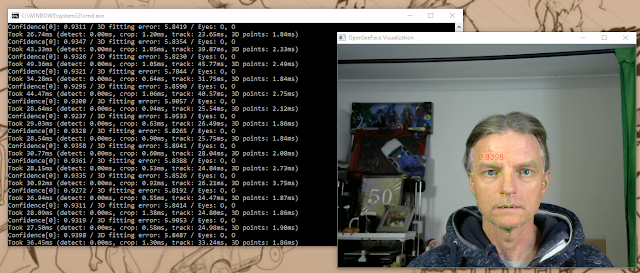
If you want to choose your camera and, as an added bonus, see a preview window of your webcam with tracking dots, in the same binary folder, run the file 'run.bat' instead. Follow the prompts to select your camera and frames per second (entering -1 for the default camera settings, when prompted, should work fine. I selected 30 for frames per second).

OpenSeeFace Motion tracking and Preview Window.
If you run OpenSeeFace with the 'run.bat' file, once you've answered the prompt
questions to choose and set up your webcam you'll get two preview windows like
this showing you how the motion tracking is working.

Open Inochi2D Session

Once you have motion capture running, open Inochi2D Session. The only way to add your avatar is to drag them in from their folder onto Session's window. If you want to remove your avatar from the Session stage, click and drag it to the bottom left corner of Session's window (over the trashcan icon. Note: This may vanish but you can still remove avatars by dragging them to where the trashcan should be).

To position your avatar in the window click and drag the mouse pointer. To resize your avatar, the only way I could find to do this was to hold down the left mouse button over my avatar and spin the scroll wheel on my mouse.


Set Up Inochi2D Session's Environment

When Session started a bunch of setting windows are already open (stacked on top of each other). If not you can turn them on under the View menu. Move the tracking window over one of the side tabs that appear when you click on its title bar and drag it to attach it to the side of the window. You'll be using this a lot to fine tune your model.

Through the Scene settings window you can add a background to your scene, or make it one of four colors you may want to chroma key out in OBS, so you can have your avatar stand in front of things etc.
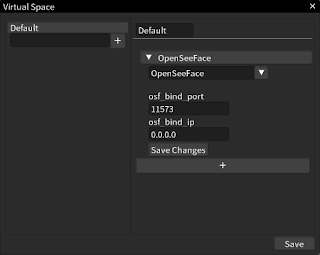
Inochi2D Session's Virtual Space Window.
Inochi2D Session's Virtual Space window
set up for OpenSeeFace.
Finally you'll want to go into the View menu and select 'Virtual Space' under Configuration. This is where you link Session to OpenSeeFace.

If this is your first time using session you'll need to set up a space by typing any name into the box and hitting the '+' button. Now select the space you just created. You'll see it appear alongside with a plus button for you to click.

Click it and select OpenSeeFace from the drop down box. Then enter 11573 into the osf_bind_port box and 0.0.0.0 into the osf_bind_ip box. Click Save Changes then click Save on the whole Virtual Space Window.

If you're standing in front of your camera you should see your avatar starting to react to your movements. If you're not seeing any action in the tracking box click on your avatar to select it, and you should see the tracking box (and blend shapes window) light up with info.


Fine Tune Your Tracking Settings

The final step is to fine tune all the tracking settings to minimize the amount of jitter you may be seeing. This is done by increasing the dampen setting for each attribute. Once you're happy click the Save to File button at the top of the tracking window to have all the tracking info saved with your Avatar (so you won't have to adjust all the tracking each time).

TET and Mia Mannequin Avatars in Inochi2D Session with tracking information.
Once OpenSeeFace is connected you should see tracking information for the currently
selected avatar appear. Use the tracking window to fine tune the Dampen settings
to remove jitter from the motion capture.

From here you're good to go. Follow the first Mannequin tutorial I mentioned above for how to connect Session up to OBS.

Note, Session will allow you to open more than one avatar at a time and they will both move in unison from the same motion capture feed. I presume it must be possible to have multiple motion capture sources so that you can, potentially, have two or more people operating separate avatars on one live stream.

My Cartoon Animator TET Avatar

Just to finish up this series on VTuber software and Inochi2D I will give you a quick update on my own TET, Cartoon Animator Avatar, that I was trying to rig in this software.

While I never rigged the full character for Inochi2D, the rig for just switching the mouth sprites I was working on in part 1 of this series, I was able to test in Session. 

Initially it worked the way it did in Inochi2D Creator with the mouth shapes dissolving between sprites. Which obviously wasn't useable, even though the dissolve was quick, it was very noticeable.

I then started playing around with the 'tracking out' settings in Session for the Mouth Open Tracking and fixed it just by switching the second tracking out number to one or higher. The mouth sprites switched exactly as expected and looked great.

Comparison of the effect of increasing the tracking out mouth open value in Inochi2D Session.
On the left is my TET Avatar in mid mouth sprite change with the crossfade effect. Increasing
the Tracking out maximum to one or more resolved this for a clean, instant sprite switch.

I didn't take my own Cartoon Animator TET Avatar any further for this blog post series because I need a lot of time to just tinker around with how to actually rig it, and to learn how the various options correlate to the motion capture (not to mention adding in auto motions). Time I just don't have in the space of a couple of weeks.

If you want to see what's possible with an Inochi2D Avatar try one of Inochi2D's demo models in Session. Hook all the tracking up to the various parameters. Or even try a female Mannequin avatar in Session (since it will already be rigged and ready to go).

The thing to take away, if you want to use character templates from Cartoon Animator as a source of sprites for an Inochi2D Avatar, it is certainly possible, and you can sprite switch the mouth, rather than creating a new mouth in the more typical VTuber style of deforming the lips in front of an interior mouth sprite.

If I get my Avatar up and running I will no doubt add a third post to this blog series. For now, There is enough here to make up for the lack of documentation for Session, and the documentation for Creator should be more than enough to help you rig your characters. 

I think I've focused on VTuber software more than enough and it's time to move on to other animation and video related topics. 

Comments

Popular posts from this blog

Inochi2D - Free Open Source 2D VTuber Avatar Rigging and Puppeteering Software (Part 1)

Inochi2D Creator - Free Open Source VTuber Software. If you've been looking for a way to live perform as a 2D cartoon avatar on camera, whether it be for a live stream or for pre-recorded content like educational videos, then VTuber software is a low cost (or even no cost) option worth looking into. In my previous post, How to Become a VTuber - 2D and 3D Software for Creating and Controlling Your Avatar , I took a brief look at the relatively new but completely free and open source Inochi2D  which I thought showed great potential for my own needs of creating a live performance character rig for my own TET Avatar that I use for all my promotional materials. While it is possible to live perform my character using Cartoon Animator itself, Reallusion's MotionLive2D capture system isn't great - with lip sync in particular. More importantly though, I can't exactly teach people how to use Cartoon Animator if I'm using Cartoon Animator to control my Avatar. What is Inochi2D...

Krita AI Diffusion - Generative Image AI For Krita is Seriously Useful, Powerful and Free (If You Can Install it Locally)

Generative AI sequence of a woman in a business suit. From sketch to refined image using Krita AI Diffusion - by TET G enerative image AI, where you describe an image with a text prompt to an Artificial Intelligence model and it produces a new image based on your prompt, is gaining a strong hold as a tool for many artists. Krita AI Diffusion brings generative AI image tools right into your favourite free and opensource, graphics editor, Krita. Not only that, if you have a computer with decent specs (and at least 10GB of hard drive space), Krita AI Diffusion is completely free. What If I Don't Have a Powerful Computer? If you're in my situation, with a computer that was around before anyone in the mainstream had even heard of generative AI, you can still access Krita AI Diffusion for free, using a cloud based AI server, Interstice  and 300 tokens, to get you started. Once your initial tokens run out, purchase 5000 more for 10€ (approx US$11.00). Tokens never expire. I would...

The Ultimate Independent Animator's App and Resource List - Animation and Video Life

Image created with Cartoon Animator 4. Being an independent animator is not like a studio animation job. There's so much more to do that is indirectly related to the actual task of animating. Over the years I've sought out many apps, tools, and services that can help me achieve that one single task, expressing myself through animation. Below is my Ultimate Independent Animator's Resource List for 2024 (last updated Oct 2024). It started out as a list of free or low cost apps that could help you in every stage of producing either 2D or 3D animation, and then just kind of grew from there. You may not have been looking for a Time Management App as much as you needed something to get you started in 3D animation but when those commissioned projects start coming in you'll have a head start on maximizing your time. All the apps and services on this list had to meet two main criteria: They had to be useful and relevant to an Indy Animator/artist. The base app/se...

Wonder Unit Storyboarder - Free Storyboarding Software for People Who Can (or Can't) Draw

Wonder Unit Storyboarder.  As an independent and solo animator I'm always tempted to try and skip storyboarding my animated shorts because they're usually only single scene sketch comedy type jokes. As a result I have many unfinished projects that kind of petered out due to having no clear finishing line. Storyboarding your productions, no matter how small, gives you a step by step guide of every shot that needs to be completed (no planning shots as you animate). It also allows you to create an animatic that gives you a rough preview of the finished production. In short, you shouldn't skip storyboards as they, generally, increase the chance of the project being completed. Disclaimer - I'm Not a Fan of Storyboarder Upfront, Wonder Unit's Storyboarder  is not my preferred storyboarding software. However it's completely free, has a number of very compelling featu...

Glif (Alpha) - Make Your Own Tiny AI Powered Niche Image Generator Apps

I  first heard about Glif through a YouTube video that mentioned you could get access to Flux Pro (the latest 'game changer AI' generative image model) through the site for free. While I had a vague notion from the video of what Glif was, I wasn't expecting it to be so easy to get started with, and so good with my very first results. Glif is an easy to use, low-code platform for creating tiny AI-powered generators called Glifs. While that may not sound inspiring, what Glifs allow you to do is create a tiny app that niches down to a specific type of AI generation that the user modifies with their own inputs. The best way to really understand is with an example.  My First Glif I've recently been using VivaGo's AI platform  (free and unlimited at the time of writing) to consistently generate full body characters in a front facing T-Pose that I can rig as front facing characters in Cartoon Animator. Unfortunately it can be a bit hit or miss maintaining the T-Pose part...

LTX Studio (Beta): AI-Powered Visual Storytelling, From Script to Screen in One App.

LTX Studio can generate consistent characters across storyboard panels - even if one character is a dragon! W hile text to image, and text to video (and image to video) AI tend to be getting a lot of the press, the real exciting aspect of generative AI implementation is how it can be used to speed up creator workflow. Being able to realize your creative vision in a shorter length of time can lead to more ambitious projects. Particularly if you're a team of one, with a very limited budget, but you one day dream of creating your own epic animated feature film. LTX Studio (beta), a new 'all-in-one' AI film making tool, is not going to let you realize that dream from a single text prompt but, by bringing a bunch of generative AI technologies together, the developers have created a one platform workflow that can help anyone rapidly visualize and deliver a story from initial idea to finished film in days rather than weeks (depending upon how ambitious the project is). Even bette...

Learn Reallusion's Cartoon Animator 5 Fast by Creating Fun, 2D, Animated Christmas Holiday Messages - Free Course by The Lazy Animator

H ave you ever wanted to send your friends and family fun, 2D animated, holiday messages, or just create 2D animated characters that you can make move and talk without learning difficult to master animation skills or spending hours drawing frame by frame? Reallusion's Cartoon Animator 5 is a professional quality, 2D animation studio software that is also very easy to produce impressive results with, even if you've never animated before, or can't draw. Don't Have Cartoon Animator 5 Download a free, 30 day trial . Easy Beginner Course I've created a completely free beginners course that teaches you my fast, easy way to rig and animate your first 2D custom character in Cartoon Animator 5 without complicated templates or any drawing skills at all. My online video course includes everything you need, including eight AI generated character sprite graphics, and four AI generated Human voice samples, so you can start learning right away. Eight AI generated character image...