 |
| KIT Scenarist Script Writing Software's Mascot, Alexander Cat. |
While you can write a script in any word processing app, if you're writing stories (screenplays) that feature characters and dialogue, a dedicated script writing app can save a lot of time formatting, letting you focus more on the actual story.
Script writing apps are also very useful if you plan to send your screenplays out to production companies, or if you're collaborating with actors and other production people, who are used to scripts being in a particular standard format.
[Note: In case you're wondering there are reasons scripts follow a standard format and are always written in Courier (typewriter) font, including but not limited to; being easy to read by actors, plenty of space for notes, and the general rule that one page of a script (in this format) equals approximately one minute of screen time.]
KIT Scenarist, in my opinion, is one of the best script writing apps out there for ease of use, simplicity, and most importantly, its script development structure. It's more than just a script formatting tool. You can literally use its main menu structure as a workflow for developing your idea into a final script.
The desktop version of the app is free and available for Windows, Mac OSx, and Linux, with paid only mobile apps available for iPhone and Android. There is a Pro version for desktop with the only difference being you get access to dedicated cloud storage - useful for online collaboration and for syncing with the mobile apps. For me the desktop app is more than enough.
 |
| Mia, the Tourist, and R2-D2 (Oppa Doll Version). |
Rather than write a simple review of Scenarist I thought I'd run through how I used it to develop the script for a new animated short featuring my characters, Mia, the Tourist, and their replica R2-D2 droid. For this animation I'll use the Oppa Doll versions of the characters that I rigged for Cartoon Animator.
Getting Started
Once you've installed Scenarist and started the app the user interface is pretty self explanatory. You could probably work everything out yourself but I do recommend clicking the Help button and reading just the second article on the Help page to quickly orientate yourself. It'll take you all of five minutes as it's mostly images and 90% of the page is user comments.
 |
| KIT Scenarist Start Screen. |
From there create your first project.
Quick side note - on the left hand menu bar there is a top item labelled 'Menu'. It looks like it's just a label header for the menu bar below but clicking on it does actually bring up a menu with options to save your project and more.
If you have a script in mind that you're just itching to get written down you can go straight to the Script section and just start writing. If, like me, you're starting from nothing, open the Research section.
Research
The Research section is by far my favorite part of Scenarist. Even if you're not writing a screenplay or script at all it's very useful for gathering all your ideas and inspirations into one place. I used just this section to plan my entire video course, The Lazy Animator Beginner's Guide to Cartoon Animator, for which I never wrote a script beyond outlines for what each video would include.
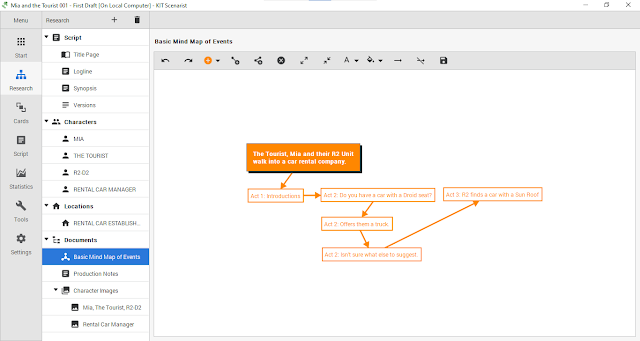
As you can see below, once you open the research section you're presented with a list of areas you can begin developing. It's not as complex as this screen shot looks since I've opened my already significantly worked on, Mia and the Tourist project for the screenshot as an example.
 |
| Scenarist Research section includes a basic mind mapping tool. |
When I'm writing a script from scratch I begin by filling in the details under the Script heading. First I'll come up with a logline as a starting point. A logline is essentially a one or two sentence pitch describing the plot of your story. My logline for my script is:
Dimensional time travelers, Mia and the Tourist, along with their replica R2-D2 droid make inquiries about leasing a vehicle with a 'droid seat'.
If you were pitching a script you'd probably want to go with something that hooks people in more than this however I'm writing a brief comedy sketch around this premise, so it'll do.
Next I fill in the Synopsis (which is a summary of your story). To do this, I simply expand on my logline, describing major plot beats until I have a rough summary of the beginning, middle, and end of my story. Two or three paragraphs is enough. My synopsis:
Dimensional time travelers, Mia and the Tourist, along with their replica R2-D2 droid, visit a car rental company with the intent to lease a car with provisions for a 'droid seat'.
Comedy ensues as the rental car manager isn't sure if they're being serious about their very specific requirement.
There is an exchange of dialogue until they finally resolve the situation by choosing a car with a sun roof.
From there I'll start adding my major character names to the character list. For each character you can optionally add any description about them you feel is relevant in helping you understand who they are and what their motivation is.
Character names will be auto filled once you start writing your script (and if you add new characters directly in the script as you write, they will automatically be listed here).
Next I'll list locations I know are going to be in the script. Just like characters you can add descriptions if you need more detail.
Finally there's a documents section where you can add folders, images, text, URLs, and even simple Mind Maps made with Scenarist's built in mind map feature. All of these different types of documents can also be added directly under your character and location listings too.
For example if you want to include an image of each character you can add an image gallery to that character in your character list.
In the image above I made a simple mind map of my script's synopsis just as a demonstration. Usually I'd only use a mind map to brainstorm ideas if I was drawing a complete blank on what to write as a script.
Cards
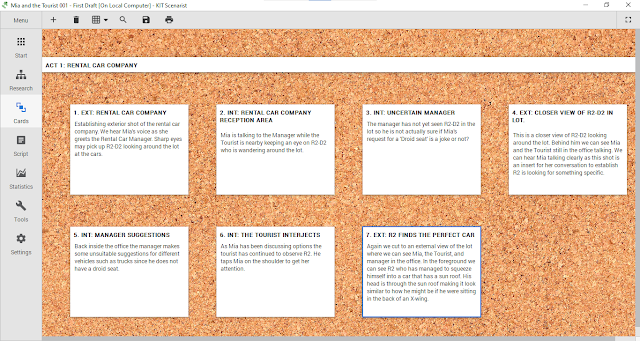
Once I've made a good start on my research (I'll do more later if need be) I'll move on to the Cards section. This is a simulated digital corkboard where each card represents a scene in your script - i.e. the card titles will be automatically added to your script as Scene Headings.
 |
| Scenarist's Scene Cards is a digital cork board that allows you to move scenes around. |
I usually flesh these out by taking my synopsis, and breaking it up into scenes. Then I'll add a brief description (usually without dialogue) of what happens in the scene. Which is what you can see in the image above. The descriptions on the cards do not appear in your script but you can have the current card scene description viewable in a separate panel as you write your script.
You don't need to number each card as this is done automatically, and they will be renumbered if you reposition a card simply by dragging it around. Moving scene cards around here will move the scenes around correspondingly in your script.
If you have a lot of scenes you can group them into 'Act' folders by adding an Act heading instead of adding a scene card.
Once you're writing your script in the script section, if you add in a new scene heading, a card will automatically be added here with that scene heading.
Script
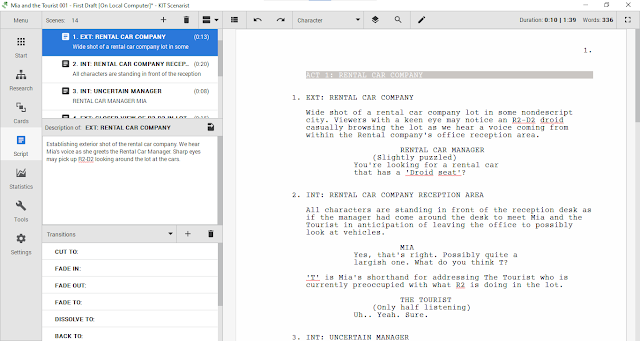
Once I've made some headway on my cards I'll start writing my script. This section of Scenarist is where other screen writing apps start and finish. It automatically formats text as you write and, by hitting the TAB key you can quickly change a line from a scene heading to action, character, dialogue, or parenthetical.
 |
| Scenarist's script writing section. Here I have my card description window open so there is no need to switch to the Cards section to see what happens in a scene. |
I'm not going to go into the features of this area in great detail. It's all pretty standard for a script writing app. I will mention that if you want to have the card scene description window open (which can also be updated here as well as in the cards window) it isn't open by default. You'll have to make it viewable from the Show/Hide menu at the top of the Scene List section.
When it comes to actually writing your script don't fall into the rookie mistake of writing the entire thing in order from start to finish. I'll write any scenes I have fully fleshed out in my head (or even partially fleshed out) first, then start working on the rest as the ideas come to me.
That's one of the real benefits of a screen writing app. You don't have to work in order. You can even go back to your cards and add more description there, move them around etc. Use your card descriptions as a starting point for each scene in your script.
On a side note, if you're completely new to writing screenplays and want to know not just how to format a script but also what all those jargon terms mean, the YouTube channel StudioBinder has you covered with their six minute crash course video:
Statistics
I must admit I don't pay a lot of attention to statistics when I write my own scripts but if you do then Scenarist has a good range from character and word counts to how big a percentage of dialogue each character has spoken.
 |
| Scenarist Summary Statistics Page. |
Within the statistics section there are useful features like the ability to isolate each character's dialogue. Which might be useful if you have a large script and just wanted to send your voice actors only their character's dialogue.
There's even a couple of interesting charts that analyze story structure and character activity.
Some of this could be handy if you're trying to give characters equal screen time or just want to know if there's enough action compared to dialogue etc. Most useful for me is the duration estimates both on the summary page and for individual scenes, in brackets next to the scene headings in the script writing section.
Tools
The tools section allows you to restore your script to a previous backup version (by default Scenarist automatically backs up your script to a specified folder) or to compare versions. If you're the kind of writer who likes to save earlier drafts. Scenarist will let you create multiple drafts of your script from the 'Menu' button menu. I'd imagine this is where the detailed statistics would really come in handy.
Preview, Importing, and Exporting Your Script
All of this can be done from the 'Menu' button menu. Scenarist is compatible with and can import many common script writing and word processing apps including; Final Draft, Trelby, Fountain Text, and Celtx. It can also export to a few different formats including Fountain Text, and PDF.
A nice touch is being able to export your research to PDF documents too.
Settings
Scenarist can be configured for a wide range of different languages and includes other standard script templates for different regions (or make your own) that you can make the default.
The interface has light or dark versions and you can customize which panels you want showing by default.
---o ---o--- o---
As a script development tool Scenarist is really well thought out. The addition of the research and cards sections put this a step ahead of many other screen writing apps. It's a great tool for when you're starting completely from scratch.
The script that I developed for this article I wrote most of it in an afternoon (admittedly it's only three pages long). If you look at my scene cards (in the Card section above), at the time of writing this, I still have some dialogue to write between Mia and the car rental company manager.
The workflow of brainstorming a few loglines and settling on the most promising. Then writing a synopsis and expanding the synopsis into scenes and cards. Then using the cards to actually start writing your script is an excellent way to prevent 'blank page syndrome'.
It's hard to believe Scenarist is completely free and I haven't even covered all the features (such as the ability to add annotations and other features that may be useful if you're collaborating on a script).
It really is the ideal script writing tool for most screenplay writers.

Comments
Post a Comment
This blog is monitored by a real human. Generic or unrelated spam comments with links to sites of dubious relativity may be DELETED.
I welcome, read, and respond to genuine comments relating to each post. If your comment isn't that save me some time by not posting it.