How to Use Plask and Reallusion's 3DXchange to Create Full Body 3D Motion Capture Animation for Cartoon Animator
Last month I reviewed Plask, a free, browser based app that allows you to create 3D motion capture files for animation from a webcam or prerecorded video footage.
At the time my hope was that Plask could be used to create 3D motion capture files for Cartoon Animator 4. Unfortunately my knowledge of how to export 3D animation motion files between applications is fairly basic and I wasn't able to figure it out.
However, thanks to 3D animation enthusiast and game developer, Freedom (of the YouTube Channel Freedom Arts), who published a tutorial on how to use Plask with iClone7 characters (in my review I wasn't able to work that out either) there is now a workflow from Plask, via Reallusion's 3DXchange, to Cartoon Animator that is relatively easy to follow and works well.
Note: If you want to try this out, 3DXchange is available as a free 30 day trial download if you don't have it.
Creating Your 3D Motion Capture File in Plask
I'm not going to do a detailed run down of how to do this as I mostly covered it in my previous article Plask - Free, Brower Based, Motion Capture Using Only a Webcam. It's not a difficult process to learn from Plask's own, very concise video tutorials. Will take you about ten minutes.
Whether you create your 3D motion file from a webcam capture or a prerecorded video doesn't matter. All you need to know is that your final motion file needs to be exported from Plask as a .FBX file (as I described in my previous article).
Convert Your .FBX File to a .rlMotion File with 3DXchange
Freedom Arts uses 3DXchange 7 (Pipeline) in his tutorial but I managed fine with the Pro version. Critical to this process is downloading Freedom Arts free Plask Mocap Mannequin.iAvatar file, a special 3D character file that (I presume) is properly mapped to the motion component of the .FBX files Plask creates.
Once you have this file downloaded, open 3DXchange and drag it into the main stage window.
Next, make sure you can see the Motion Library window in the right hand Modify panel. Drag your .FBX file over the Motion Library window. Click okay to the Characterization Profile window that comes up.
 |
| Import the Plask Mocap Mannequin and your Plask .FBX motion file into 3DXchange. |
At this point you can preview your motion in 3DXchange by selecting it in the Motion Library window and clicking the Play button on the player (below the stage area).
Next, under the Motion Library window click the Add All to Perform Button. You'll see your motion is now listed in the Perform Editor Window, below the buttons.
In the Perform Editor window click once on the name of your motion and rename it to something more meaningful (this step may be optional but Freedom does it in his tutorial).
From the File Menu select Export... (or click the Export Button).
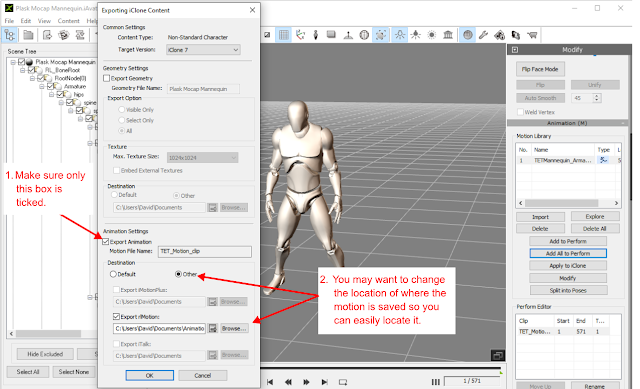
In the window that opens make sure only the Export Animation box is ticked. You may want to change the file Destination to other and browse to the folder you want to save the file in for easier locating later (make sure you choose Export rlMotions.
Click the OK button.
 |
| Exporting the motion capture as an rlMotion file. |
At this point the .rlMotion file you have saved can be used with both characters in iClone7 and Cartoon Animator 4. In the case of iClone7 it's as simple as dragging the motion file onto a character on the stage.
Importing your rlMotion File into Cartoon Animator.
In Cartoon Animator 4 .rlMotion files can be applied to G1, G2, and G3 characters.
G1 characters are converted to single angle G2 characters when added to the stage (this is how CA4 maintains its backward compatibility with G1 characters). Therefore importing .rlMotion files into CA4 is exactly the same for G1 and G2 characters.
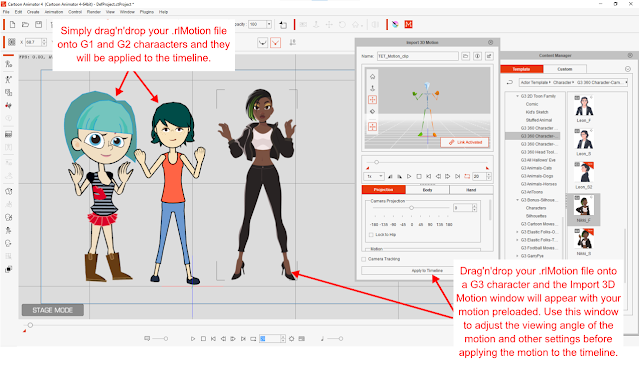
Simply place your G1 or G2 character on the stage. Then drag'n'drop your motion file onto the character. The motion will be added to the 2D Motion track in the timeline where you can make further edits.
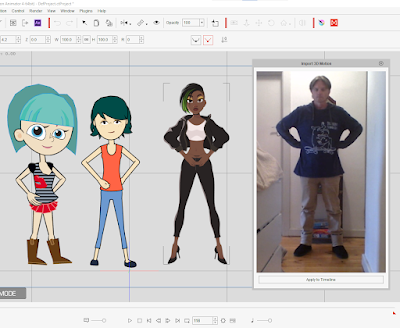
G3 Characters are handled very differently. First select your G3 Character on the stage. Go into the Animation menu and select Import 3D Motion. The Import 3D Motion window will open. From here use the file finder across the top of the window to locate and import your .rlMotion file. Alternatively you can drag'n'drop the motion file onto your character and the Import 3D Motion window will open with the file already loaded.
Now all you need to do is play around with the settings, preview how they look. When you are happy with how everything looks click the Apply to Timeline button to commit your motion to the timeline. It will be added to the character's Motion track in the timeline.
 |
| How to import a .rlMotion file into Cartoon Animator for G1, G2, and G3 Characters. |
---o ---o--- o---
Many thanks must go to Freedom Arts for making this possible with his Plask MoCap Mannequin Avatar for 3DXchange. While it would be more ideal to export .rlMotion files directly from Plask, this is a great workaround.
If you already have iClone7 there's a good chance you purchased a bundle that included 3DXchange. If you don't there's some consolation in knowing that 3DXchange Pro will do the trick which, at USD$199.00 is less than half the price of 3DXchange Pipeline ($499.00). I strongly suggest keeping an eye out for sale prices.
On the plus side, Plask teamed with 3DXchange Pro is still the cheapest way, by a long shot, to get full body motion capture animation into Cartoon Animator.

