
 |
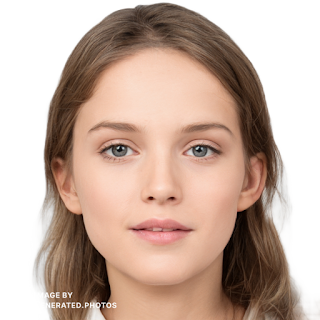
| Source Photo from Generated Photos. |
Ever since Reallusion introduced the G3-360 Character Head into Cartoon Animator 4 I've wanted to see if their 360 Head Creator tool could be used to create an animated head using a photo. Part of the reason I've never given this a shot, until now, is that I just assumed it would be difficult, and require a lot of photo editing to blend out the sprite edges.
It turns out, creating a photographic G3-360 head is not that much more difficult than creating a cartoon head, and can be done using a single photographic image using my own G3-360 head rigging system.
While this article isn't intended to be a full tutorial, I'll run through the basic steps of how I achieved my photographic G3-360 head, shown in the comparison below, of a Cartoon Animator Morph-based head on the left, and my G3-360 head on the right.
Pros and Cons
Cartoon Animator's morph-based head system is ideal for animating photographic faces. It uses a semi 3D wire mesh that does a relatively good job of warping and deforming the image so it looks like a real face. In fact the animation of the eyes, and especially the mouth is very smooth and looks quite natural.
The problems arise when you want the head to turn from side to side or move up and down. The more extreme you turn, the more the illusion is destroyed because the distortion looks unnatural.
While my implementation of a photographic G3-360 head is relatively good, in more expert photo editor hands it could be even more seamless, with the main benefit being far more range when turning the head side to side or up and down. You could even get more range by sprite switching between photos that actually show multiple views of the head. In my head I was trying to see how much range I could get from a single photo image.
The cons for using a G3-360 head for photo images are mainly with most of the eye and mouth movements being achieved through sprite switching. It's not nearly as smooth or natural (especially the mouth) as the morph-based head.
Head Creation Process
Selecting an Image
The first consideration when turning a photographic head into a G3-360 head is how the face is lit. Ideally you want a face that is evenly lit from the front with no high contrast shadows. Soft, light shadows preferred. This is why I sourced my photo from Generated Photos, an Artificial Intelligence (A.I.) face generating tool. None of the images produced are real people, and they're all perfectly lit for creating animated heads. The images can be used in commercial projects if you purchase a license.
Incidentally Generated Photos now has a Face Maker tool that may be useful, though I feel the original Browse Faces tool gives you more options much quicker.
Creating Facial Expressions with a Morph-Based Head
The unique thing about my G3/G3-360 head rigging system is that it utilizes Cartoon Animator's Morph-based head system to help generate all the sprites you need to rig a single image G3/G3-360 head. This has the secondary advantage of having a morph-based head version saved for those times when animating that style of head is the better option.
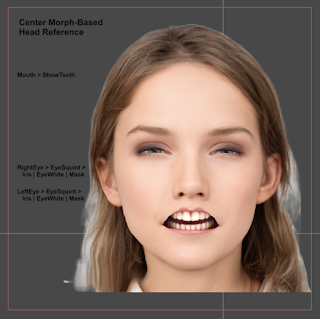 |
| The Facial Expression Project - Show Teeth. |
Once the morph-based head is rigged I then load it into my Facial Expressions Project in Cartoon Animator. This is a special project I've created, that is included in my G3-360 head rigging tutorial, that automatically generates all the facial expressions you need to create all the face sprites in a G3-360 head.
The expressions you get aren't always particularly realistic for a photographic head. The mouth especially can distort into far too extreme positions.
You can adjust all the expressions to be less extreme before you export the 15 individual images as PNGs but for this test I just left them as is.
Creating a PSD Character Template
The next step is to set up a character in Cartoon Animator to use as your template. I did this by importing my face image as a freebone character, to which I added two bones, the neck and head bones.
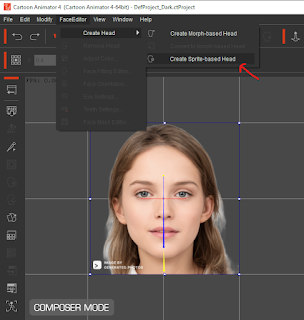 |
| Creating a Sprite Based head template character. |
You could also start with any G3 Dummy Character as well, if your photo is a full body image. You could then rig the body using my One Sprite Character Rigging Tutorial Bundle.
Whichever method you choose the next step is to select the option to create a sprite-based head. This will add a dummy sprite head and all the face bones needed to create a G3 Standard Head.
I would recommend sizing the head so it approximately matches the size of your photographic head. This will ensure all the face bones are closer to their final locations.
From here you export your character to you preferred PSD editor. In my case that's Krita.
Creating All the Sprites
At this point there is no way I can give you a detailed explanation of all the steps, in a single blog post, of how all the sprites are created, organized, and all the bones are positioned. If you want to know buy my tutorial - it's very low cost.
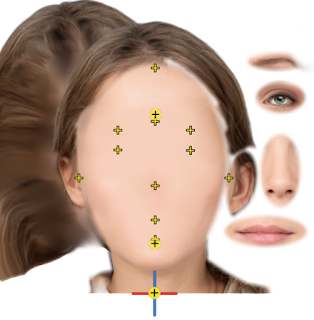 |
| Exploded view of my PSD template. No advanced photo editing here. |
Instead I'm just going to highlight how little I actually did to blend the sprites. Almost anyone with very basic editing skills could do this.
If you look at the image of the 'exploded' view of my PSD template you'll see I mainly erased all the features from the face and added lightly blended edges to everything.
There was no complex cutting around the eyes, eyebrows, nose, or mouth, I simply drew an ellipse shape around them, added soft, blended edges, and I was done.
While this makes the whole process look quite simple, keep in mind there are 15 mouth sprites to create, and 12 eye sprites (6 for each eye). I also had to separate the iris from the eye white so the eyeballs could move around. Although I didn't time myself, I would estimate I spent the best part of four hours just on creating all the sprites. I might be able to do this stage quicker in the future, now I know what's required.
Importing the template back into Cartoon Animator
Once you import the finished template back into Cartoon Animator you end up with a standard G3 Head. It's useable but has very little range when it comes to being turned left or right or moved up and down.
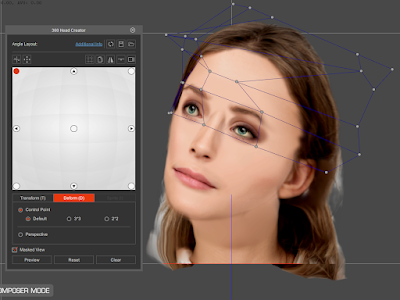
Converting a G3 Head to a G3-360 Head
Now you have your G3 standard head, simply fire up the 360 Head Creator in the Character Composer and apply the Quick Head Setup with the default settings (or change them if you wish but better to use the default on your first head setup).
I'm not going to go into my process in great detail as, again, that information is in my tutorial but the basic process I use is a combination of the transform and deform tabs in the 360 Head Creator. You can add more key frame angles later if you wish but the default nine points are all I ever use.
 |
| Here you can see how much I deformed the front hair sprite in order to make it work at this angle. |
The middle (default) point is already done.
Next I adjust all the sprites, using mostly deforms until I get a good looking, left, middle facing angle, that turns convincingly when previewed from the center key to the left. If your head has a symmetrical design like mine does you can then mirror copy the left, middle angle to the right, middle angle.
Next copy your left, middle angle and copy it to your left, top angle. Rotate the whole face about 30 degrees, looking up. Adjust the head placement until it feels like it's sitting naturally where it would on the neck in that position. Preview and adjust until the head looking up feels like it moves naturally between the left, middle key and the left, top key. Once it's good, mirror copy the left, top key to the right, top key.
Now do the same steps for the left, bottom key, and right, bottom key - though angle the head down (obviously) about 15 degrees.
That leaves the top, middle key, and bottom, middle key to manually adjust until they work well with the other angles.
If you want more information on my own G3-360 head creation process I give a more detailed run down in Creating a Complex G3, 360 Character Head in Cartoon Animator 4 - Tips and Recommendations.
Download My Project Files Free
If you would like to study my project files, they are free to download below. Just enter $0.00 in the payment amount if you are asked to enter an amount. Included is my Cartoon Animator 4 Project file, the original source image, my PSD template, and the final animation as an MP4 file.
These are provide purely for you to study and may not be used in commercial projects at all (due to the Generated Photos source image).
Comments
Post a Comment
This blog is monitored by a real human. Generic or unrelated spam comments with links to sites of dubious relativity may be DELETED.
I welcome, read, and respond to genuine comments relating to each post. If your comment isn't that save me some time by not posting it.